Pages

Showing posts with label Code. Show all posts

Friday, 7 April 2017

How to create Tables dynamically using JavaScript !

We all use HTML tables on our web pages as they provide a sophisticated and better look to our website, however rather than writing the <tr> and <td> tag manually for the number of rows and columns in our table, we can simply create tables dynamically by using Javascript.


In this article of mine, I am going to provide a very simple javascript trick, a very simple code snippet to create tables dynamically.The code snippet is consisting of both a static table and a dynamic table generated using Javascript so that you guys can easily understand how easy it is to generate table dynamically by simple and less written code.

Here is the code snippet:

<!DOCTYPE html>
<html>
    <head>

        <title>Dynamic Table using JS</title>
       
    </head>
    <body>
        <h1>Static Table</h1>
        <table border="2">
            <tr>
                <td>1</td>
                <td>2</td>
                <td>3</td>
            </tr>
            <tr>
                <td>1</td>
                <td>2</td>
                <td>3</td>
            </tr>
             
        </table>
        <br/>
        <h1>Dynamic Table</h1>
        
        <script type="text/javascript">
           
           /*initializing variables*/
           
            var table=' ';
            var rows=5;
            var cols=5;

           //one for loop is for creating the rows

            for(var r=1;r<=rows;r++)
            {
                table+='<tr>';

               //another for loop is for creating the columns

                for(var c=1;c<=cols;c++)
                {
                    table+='<td>'+c+'</td>';
                }
                table+='</tr>';
            }
           //javascript function to write on webpage
          
         document.write('<table border=2>'+table+'</table>');
        
      </script>
    </body>
</html>

Screenshot:

That's it in this article of mine, as you guys can see it is that much simple to generate a dynamic table using Javascript, it provides the flexibility to the user to change rows and columns dynamically rather than typing the whole code again and again.

Sunday, 26 March 2017

Simple Password Strength Checker using HTML,CSS and Jquery !

Password Strength Checker is an important plugin that can be implemented within the signup form of a website. The Password Strength Checker helps the user to identify the intensity of the entered password whether it is weak or strong, and if it is weak then the individual user needs to modify it and make it stronger.It is always advisable to have a strong password as we know that having a weak or common password can lead to a security breach and someone can easily hack into our account by breaking down the weak password.


In order to calculate the Password Strength, it is checked against several different  aspects, for example, whether the password contains special characters or not, what is the length of the password it should always be more than at least 5 characters, whether there is a capital letter as well in the password or not and one thing more whether the entered password is alpha-numeric or not. All these points are tested against and if all these points are taken care off then it is damn sure that the entered password is Strong enough to secure your account.

The Code Snippet that I am going to show you guys today is very simple and easy to implement and It is also very easy to understand.

Let us get started:

1. index.html page:

<!DOCTYPE HTML>

<html>

<head>
<title>Password strength checker in HTML and JQuery</title>
<!-- Adding the required jQuery Library-->
<script src="http://ajax.googleapis.com/ajax/libs/jquery/1.7.1/jquery.min.js"></script>
<!-- Our CSS file to handle the designing of the webpage-->
<link rel="stylesheet" href="passwordscheck.css" />
<!-- This is our jquery file that is containing the code for calculating Password Strength-->
<script src="passwordscheck.js"></script>
</head>
<body>
<div id="container">
<div id="header">
<h2>Password Strength Checking with jQuery</h2>
<hr>
</div>
<div id="content">
<form id="register">
<label for="password"><b>Password : </b></label>
<input name="password" id="password" type="password" placeholder="Type Your Password here"/>&nbsp;&nbsp;
<!--In this span the password Strength will be displayed-->
<span id="result"></span>
</form>
</div>
</div>
</body>
</html>

2. passwordscheck.js:

$(document).ready(function() {
//calling a function on the keyup event of the password input field
$('#password').keyup(function() {

/*as result is the span where we will be showing the password strength, we are appending the result by calling .html and inside it, we are calling our checkStrength function and password value as the parameter.*/

$('#result').html(checkStrength($('#password').val()))
})

//this is function which is checking the password Strength

function checkStrength(password) {
var strength = 0
if (password.length < 6) {
$('#result').removeClass()
//here we are adding CSS classes as per the Password Length and returning a String Value
$('#result').addClass('short')
return 'Too short'
}
if (password.length > 7)
strength += 1

// If password contains both lower and uppercase characters, increase strength value.
if (password.match(/([a-z].*[A-Z])|([A-Z].*[a-z])/))
strength += 1

// If it has numbers and characters, increase strength value.
if (password.match(/([a-zA-Z])/) && password.match(/([0-9])/))
strength += 1

// If it has one special character, increase strength value.
if (password.match(/([!,%,&,@,#,$,^,*,?,_,~])/))
strength += 1

// If it has two special characters, increase strength value.
if (password.match(/(.*[!,%,&,@,#,$,^,*,?,_,~].*[!,%,&,@,#,$,^,*,?,_,~])/))
strength += 1

// Calculated strength value, we can return messages
// If value is less than 2
if (strength < 2) {
$('#result').removeClass()
//here we are adding CSS classes as per the Strength Value and returning a String Value
$('#result').addClass('weak')
return 'Weak'
}
else if (strength == 2) {
$('#result').removeClass()
//here we are adding CSS classes as per the Strength Value and returning a String Value
$('#result').addClass('good')
return 'Good'
}
else {
$('#result').removeClass()
//here we are adding CSS classes as per the Strength Value and returning a String Value
$('#result').addClass('strong')
return 'Strong'
}
}

});

3. passwordscheck.css:

Simple CSS rules for our WebPage:

body{
margin: 0;
padding: 0;
font-family: "Times New Roman", Times, serif;
font-size: 15px;
line-height: 2.0;
}
#container {
width: 535px;
background: #ffffff;
padding: 20px;
margin: 90px auto;
border-radius: 5px;
height: 150px;
border: 2px solid gray;
}

#header {
text-align: center;
background-color: #FEFFED;
border-radius: 5px;
margin: -39px -20px 10px -20px;
}

h2{
padding-top: 10px;
}

#content {
margin-left: 57px;
margin-top: 40px;
}

#register label{
margin-right:5px;
}

#register input
 {
padding: 5px 14px;
border: 1px solid #d5d9da;
box-shadow: 0 0 9px #0E34F5 inset;
width: 272px;
font-size: 1em;
height: 25px;
}
/*The CSS classes that we added using Jquery are defined from here on*/

#register .short
{
font-weight:bold;
color:#FF0000;
font-size:larger;
}
#register .weak
{
font-weight:bold;
color:orange;
font-size:larger;
}
#register .good
{
font-weight:bold;
color:#2D98F3;
font-size:larger;
}
#register .strong
{
font-weight:bold;
color: limegreen;
font-size:larger;

}

ScreenShot:

As per our code logic if Password Length is shorter than 6 then Too short will be displayed.

I Entered a Stong Password, therefore, it is showing Strong.

Try to check all the possibilities by entering weaker passwords and passwords without any number or special characters. It is always a good practice to add this Password Strength Checking Plugin on the Website as it gives User a satisfaction that the entered password is a strong one.

Source: FormGet

Friday, 24 March 2017

How to show the selected value in a text box using PHP and JavaScript!

Most of the time when we visit a website, we tend to see a drop down list over there, where a number of products are listed down and when we select a product from that list, we see that selected product is now available in a text box that helps a developer to understand that what product or the option the user has selected and also provides a clear view to the user what option he/she has selected. We can implement this functionality in our college project or on our website by using simple JavaScript snippet. Whenever a designer or a developer develops an interface for the user, the first thing that comes to their mind is to make the interface as simple and as interactive as it can get and in order to make the drop down list interactive this trick is used.


Source: Google Images

In this article of mine, I am going to show a simple code snippet of an HTML Page that is containing a select drop down list control and also containing a text box input field and when we select an option from the drop down list the selected option will get displayed in the text box field. Whenever an option is selected from the drop down list "on change" event occurs and we are going to call a function on this "on change" event and will code our functionality inside this explicitly created function. I am going to populate the drop down list from my database using PHP.

Here is the code snippet:

<html>
<head>
        
<script type="text/javascript">

function myfunc()
{
    var e = document.getElementById('productlist').value;
    var mytextbox=document.getElementById("showvalue");
    mytextbox.value=e;
   
 }
 </script>
        
    </head>
    <body>
       <!-- Calling the function on 'on change' event-->
        <select name="productlist" id="productlist" onchange="myfunc()">

           <option value="" readonly="true">--Select--</option>

    <?php
    //connect.php is the file where I have written the connectivity code
    include './connect.php';
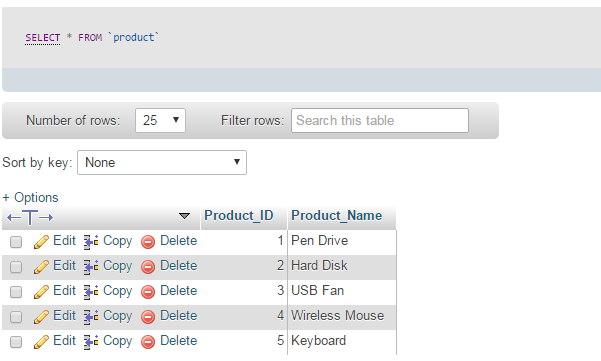
    $myquery="select * from Product";
    $result=mysql_query($myquery);
   //executing the query while record is there in the table
    while($row=  mysql_fetch_assoc($result))
    {
        //getting the product name from the table
        $pname=$row['Product_Name'];
        ?>
  
        <!-- Adding the product name into the drop-down list as a value as well as the displayed text-->
        
       <option value="<?=$pname?>"><?=$pname?></option>
                
        <?php
    }
    ?>
    </select>
        
        <br/><br/>
   Selected Value:<input type="text" name="mytextbox" id="showvalue"/>
   </body>
   </html>


Output:


My Table in the Database


Output in the browser

That's all in this article of mine, In this article, we learned how to populate a drop-down list from the database and how to get the selected value using javascript and showing it into a textbox.

Also, Read Autocomplete using JqueryUI here and Dragging Contents using JqueryUI here.

Thursday, 23 March 2017

AutoComplete Widget in JqueryUI !

Auto-completion is one of the most common mechanisms that is frequently used in modern websites to provide the user with a list of suggestions for the beginning of the word, which the user has typed in a text box or any other element that is capable of receiving an input. The user can then select an item from the list, which will be displayed in the input field. This feature prevents the user from having to enter an entire word or a set of words.This feature saves the time of the user as the user does not really need to type the entire word and it also provides a pleasant experience in front of the user as they are simply typing a single character and the whole word is coming in front of them.


As we all know that JQueryUI is a powerful front-end framework currently, It also provides an autocomplete widget —a control that acts a lot like a <select> dropdown but filters the choices to present only those that match what the user is typing into a control. jQueryUI provides the autocomplete() method to create a list of suggestions below the input field and adds new CSS classes to the elements concerned to give them the appropriate style.
Any field that can receive input can be converted into an Autocomplete, namely, <input> elements, <textarea> elements, and elements with the content editable attribute. This autocomplete widget comes with a number of attributes namely, we can autofocus on the matched records, we can define the minimum characters to be specified before the matched record is presented and we can also define a label for a particular value and you can also define an external source from where the data will be matched etc.

Let us start with a small code snippet having the default functionality:

<!Doctype html>
<html lang = "en">
   <head>
      <meta charset = "utf-8">
      <title>jQuery UI Autocomplete Default functionality</title>
       <!--defining the script files and the css files -->
      <link href = "https://code.jquery.com/ui/1.10.4/themes/ui-lightness/jquery-          ui.css" rel = "stylesheet">
      <script src = "https://code.jquery.com/jquery-1.10.2.js"></script>
      <script src = "https://code.jquery.com/ui/1.10.4/jquery-ui.js"></script>
      
      <!-- Javascript -->
      <script>
    //short form of document.ready() function
         $(function() {
            var availableCars  =  [
               "Verna",
               "Civic",
               "City",
               "Fortuner",
            ];
            $( "#automplete-1" ).autocomplete({
                //here we are defining the source of records
               source: availableCars
            });
         });
      </script>
   </head>
   
   <body>
      
      <div class = "ui-widget">
         <p>Type "V" or "C" or "F"</p>
         <label for = "automplete-1">Tags: </label>
         <!--defining the input field-->
         <input id = "automplete-1" type="text">
      </div>
   </body>

</html>

Output:


Using Autofocus Attribute:

<!Doctype html>
<html lang = "en">
   <head>
      <meta charset = "utf-8">
      <title>jQuery UI Autocomplete functionality</title>
      <link href = "https://code.jquery.com/ui/1.10.4/themes/ui-lightness/jquery-ui.css"
         rel = "stylesheet">
      <script src = "https://code.jquery.com/jquery-1.10.2.js"></script>
      <script src = "https://code.jquery.com/ui/1.10.4/jquery-ui.js"></script>
      
      <!-- Javascript -->
      <script>
         $(function() {
            var availableTutorials = [
               "ASP.NET",
               "JAVA",
               "Boostrap",
               "C",
               "C++",
            ];
            $( "#automplete-2" ).autocomplete({
               source: availableTutorials,
               autoFocus:true
            });
         });
      </script>
   </head>
   
   <body>
      <!-- HTML --> 
      <div class = "ui-widget">
         <p>Type "J" or "s" or"c" or "a"</p>
         <label for = "automplete-2">Tags: </label>
         <input id = "automplete-2" type="text">
      </div>
   </body>

</html>

Output:


See the Content is autofocussed that is matching the search
That's it in this article of mine, try and uncover the rest of the attribute that can be implemented with the autocomplete() method of JqueryUI and I am sure you guys will really find it very useful to get it implemented on your own website. Some other attributes are minLength, delay etc.

Wednesday, 22 March 2017

Drag Contents using JqueryUI !

JqueryUI is one of the most popular front-end frameworks currently. It is sleek, intuitive, and powerful mobile-first front-end framework for faster and easier web development. It uses HTML, CSS, and Javascript.


JqueryUI is a powerful Javascript library built on top of jQuery JavaScript library. UI stands for the User interface, It is a set of plug-ins for jQuery that adds new functionalities to the jQuery core library.If you have ever used JavaScript then you must be familiar with the complexity of the codes that one has to go through in order to perform a particular task, due to  the evolvement of Jquery library the code become much simpler and now as a designer or as a developer, one has to write few lines of codes in comparison to large number lines of codes of normal Javascript.

The set of plug-ins in JqueryUI includes interface interactions, effects, animations, widgets, and themes built on top of jQuery JavaScript Library.

In this article of mine, I am going to talk about the draggable method of JqueryUI, that provides the functionality of dragging the contents of an HTML page anywhere within the Viewport. This draggable method comes along with a number of attributes that extends the functionality of method and provides more options to a designer or a developer. These attributes include functionalities like dragging the content along a single axis only or dragging the content within a container only etc.

Simple Code Snippet:

<!DOCTYPE html>
<html>

   <head>

      <!--adding the necessary script files for making our document jquery compliant-->

      <script src = "https://code.jquery.com/jquery-1.10.2.js"></script>

      <script src = "https://code.jquery.com/ui/1.10.4/jquery-ui.js"></script>
      
      <style>
         #draggable { 
         width: 150px; 
         height: 150px;
         padding: 0.5em; 
         background:red;
         color:white;
          }
      </style>
      
      <script>
         $(function() {
           //here I am making mydiv draggable by calling the draggable() function
            $( "#mydiv" ).draggable();
         });
      </script>
   </head>
   
   <body>
      <div id = "mydiv" class = "ui-widget-content">
         <p>Drag me !!!</p>
      </div>
   </body>
</html>

Output:
This Div can be dragged anywhere within the viewport
Containment and axis Attribute:

The following attributes are used to limit the movement of elements on the screen.


<!DOCTYPE html>

<html>
   <head>
      
      <script src = "https://code.jquery.com/jquery-1.10.2.js"></script>
      <script src = "https://code.jquery.com/ui/1.10.4/jquery-ui.js"></script>
   
</head>
      
   <body>
      <div id = "contdiv" style = "border:solid 1px;background-color:yellow;">

         <span>You can drag me only within this div.</span><br /><br />

      </div>
      <div id = "axisdiv" style = "border:solid 1px;background-color:grey;">

         <span>You can drag me only along x axis.</span><br /><br />

      </div>

      <script>
         $("#contdiv span").draggable ({
           //here the containment attribute is used that restrict the dragging of content 
within the defined div only
            containment : "#contdiv"
         });
         $("#axisdiv span").draggable ({
           //here the axis attribute is used that will make the content draggable in a
 particular direction only, in our case the direction is x i.e. horizontal, use y for vertical.
            axis : "x"
         });
      </script>
   </body>
</html>

Output:


That's it in this article of mine, I hope you guys find it informative. Like the draggable() method, the droppable() method is also there, which allows us to drop the dragged content to some location. JqueryUI contains hell lot of more functionalities make sure to check out them as well as they can really help you in creating an awesome interface.

Read about HTML5 Drag and Drop here.

Monday, 20 March 2017

Embed Google Map in Your Website !

Most of the website that we visit, tend to contain a Contact Us page, where we tend to see a map that contains the location of their office or the location of the place from where they operate that really proves helpful for an individual to reach them by seeing the location on the map.

Source: Google Images

Now if you want to integrate Google Map in your website, you can use the HTML5 Google Maps API. This API allows you to show maps on your website. Another way of integrating the map into your website is to simply embed the code of iframe from the Google Map Website.

In this article of mine, I am going to show you guys both of these approaches.

Let us get started:

Using Google Map API:


<!DOCTYPE html>

<html>

<body>

<div id="map" style="width:100%;height:500px"></div>

<script>

function myMap() {

  var myCenter = new google.maps.LatLng(21.7679, 78.8718);

/* here we are setting the latitude and longitude position of the location that we want to see on the map, I have set the position of India, you can get the Latitude and Longitude Position from this website http://www.mapsofindia.com/lat_long/ */
  
  var mapCanvas = document.getElementById("map");

/* this variable is containing the location where we want to show the map, we have a div having the id map */

  var mapOptions = {center: myCenter, zoom: 5};

// here we are setting the option for zooming into the map

  var map = new google.maps.Map(mapCanvas, mapOptions);

//initializing the map with the above mapCanvas and mapOptions variable to display the      map in our document

  var marker = new google.maps.Marker({position:myCenter});

//adding a marker to the location, Marker - Single locations on a map. Markers can also display custom icon images
  
    marker.setMap(map);

}
</script>

//this script source has to be added into your document to use Google Map API

<script src="https://maps.googleapis.com/maps/api/js?key=yourAPIkey&callback=myMap"></script>

//In order to get the API key, you need to visit https://console.developers.google.com

</body>
</html>

Screenshot:

This is the map which gets generated from the above code, make sure you add an API key first to use this code

Embedding the Iframe:

  • The first step is to visit the Google Map website in any of your favorite browsers. Visit Google Map here.

  • The next step is to enter the location in the Search Google Maps text box, the location of which you want to get the iframe code.


  • Now click on the menu option, there you will see the share or embed map option.

    Click on the three tiles that are showing in this image to see all the available options


    Once you click on the Menu, you will see all these options from there

  • Here you need to select the Share or embed Map option, from here you will get the iframe code that you can embed in your website.just copy this iframe src and paste it into your webpage where you want to display the location.


  • It looks something like this:

  • <iframe src="https://www.google.com/maps/embed?pb=!1m18!1m12!1m3!1d7438.414368368067!2d81.64493637314538!3d21.22363134357225!2m3!1f0!2f0!3f0!3m2!1i1024!2i768!4f13.1!3m3!1m2!1s0x3a28dd00587d4af7%3A0xcfb2ef23e9503ce2!2sTagore+Nagar%2C+Raipur%2C+Chhattisgarh+492001!5e0!3m2!1sen!2sin!4v1489994087906" width="600" height="450" frameborder="0" style="border:0" allowfullscreen></iframe>

That's all in this article of mine, I hope and believe now you guys have the understanding of how you can add Map in your website either by using the Google Map API or by simply embeding the iframe, Its up to you which method you want to use for adding Map in your website.

Sunday, 19 March 2017

How to Perform Drag and Drop Operation Using HTML5 !

Drag and Drop is a common feature that we tend to see in a number of websites, for example, we tend to drag and drop a product into the buying bucket on an e-commerce site or we have seen how we can drag a file and drop it into the Facebook's What's in your mind area to upload a file, so yes if you need this drag and drop feature into your website, you can easily implement it using the HTML5. Drag and Drop is a very common feature we can say where we simply grab an object and drop it in some different location inside the viewport.

Source: Google Images


In HTML5 drag and drop is a part of the standard and every element is draggable here.All the common browsers support this HTML5 API, Google Chrome from version 4.0, Internet Explorer from version 9.0, Mozilla FireFox from version 3.5, Safari from 6.0 and Opera from version 12.0.

Here is a very simple code snippet of dragging an image into a div:

<!DOCTYPE HTML>
<html>
<head>
<style>

#div1 {
    width: 350px;
    height: 100px;
    padding: 10px;
    border: 1px solid #aaaaaa;
}
</style>

<script>
function allowDrop(ev) {
    ev.preventDefault();
}

function drag(ev) {
    ev.dataTransfer.setData("text", ev.target.id);
}

function drop(ev) {
    ev.preventDefault();
    var data = ev.dataTransfer.getData("text");
    ev.target.appendChild(document.getElementById(data));
    document.getElementById("para1").innerHTML="Data is Dropped";
    
}
</script>
</head>
<body>

<p id="para1">Drag the respective Image into this rectangle:</p>

<div id="div1" ondrop="drop(event)" ondragover="allowDrop(event)"></div>
<br>
<img id="myimage" src="images/bg-08.jpg" draggable="true" ondragstart="drag(event)" width="350" height="80">

</body>
</html>

Code Explanation:
  • First of all, we have to decide what item we want to drag, in this example, I am dragging an image, so in order to make it draggable we have to use a predefined attribute "draggable" which we need to set to "true".

  • Now we have to define a method that will be called on an event called, ondragstart, see here I am calling drag(event) on the given event and here we need to call a method named setData with dataTransfer Object, dataTransfer.setData() method sets the data type and the value of the dragged data.

  • The ondragover event specifies where the dragged data can be dropped.By default, data/elements cannot be dropped in other elements. To allow a drop, we must prevent the default handling of the element. This is done by calling the event.preventDefault() method for the ondragover event.

  • When the dragged data is dropped, a drop event occurs. In the example above, the ondrop attribute calls a function, drop(event), where the getData method is used which is getting the data based on the datatype "text" and then we are appending the child using the appendChild property to our div.
Screenshots:

BEFORE DROP

Once Data is Dropped into the Div

That's all in this article, I Hope I have given something new to you guys to play with.